Last updated
Is there something wrong with this page?
We are updating our documentation library to be ready for Sector 10! Find out more in our Sector 10 roadmap or head straight to our collection of Sector 10 - Changes and Updates.
The Sector Blog add-on offers a simple and easy to use blog to publish updates, engage with your audience, or collaborate across teams and locations. This guide explains how to add and edit your blog posts.
Visit the Sector online demo to see a blog landing page, sample blog posts, and blog archives
Adding new content to your site and Making changes to existing content on your site.
Blog Editor is an additional user role which can be assigned to users (e.g. you can be both a Content Editor and a Blog Editor).
To add a blog post, use the AdminUI toolbar and navigate to Content > Add content > Blog post
<your.domain>/node/add/blog_post
This takes you to a node edit form for a blog post node.
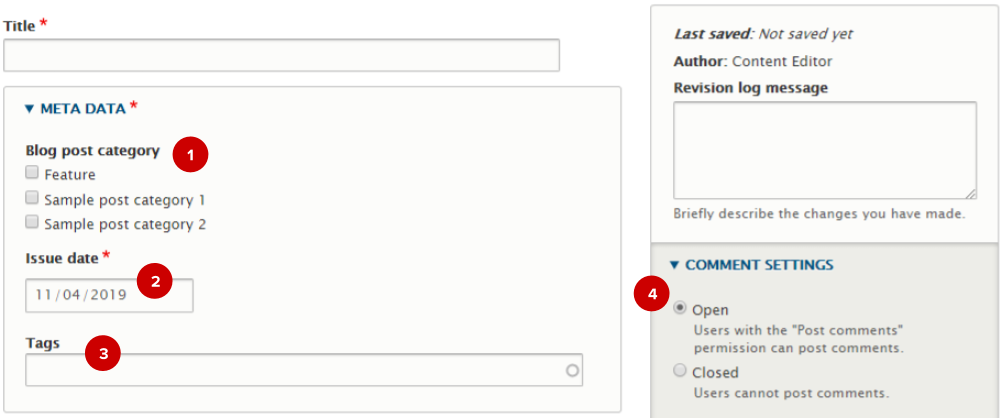
Screenshot - Selecting meta data in a blog post node edit form
Select from the 'Blog post category' multi-select list ( 1 ). The ‘Feature’ category is used to display the blog post in the feature position on the blog landing page (see demo.sector.nz/blog for an example).
The default 'Issue date' ( 2 ) will be today’s date, so change this if needed.
You can group blog posts by topic by selecting existing tags ( 3 ). New tags can be added by content administrators (see Managing taxonomies).
Add the main content of your blog post to the 'Body' field. You can learn more about using this field in Introduction to the WYSIWYG editor.
In 'Comment settings' ( 4 ) you can select if you want comments to be open (to users with the ‘post comments’ permission) or closed.
To review and change other standard node settings see Changing standard node settings.
At the bottom of the node edit form you can save and preview your content.
Before you save your blog post as 'published', you should preview it to see how it displays - see Previewing your content. Once you're happy with how it looks, publish the node.

Screenshot - Teaser of featured blog post on demo.sector.nz/blog
You may want to check what the teaser of the blog post looks like on the blog post landing page. When a blog post is put in the ‘feature’ category, a snippet from the blog post will be displayed - so if you start the body content with an image, it will display in the teaser.
You can change the summary text so it better suits the teaser display (see Introduction to the WYSIWYG editor - Body summary).