Last updated
Is there something wrong with this page?

We are updating our documentation library to be ready for Sector 10! Find out more in our Sector 10 roadmap or head straight to our collection of Sector 10 - Changes and Updates.
The WYSIWYG text editor (What You See Is What You Get) is used to manage text styles and formatting on your main text fields - and can do so much more!
The introduction of CKEditor 5 will bring major changes for Sector 10 and sites updated from Sector 9 to 10! CK 5 is a complete re-write with a part of the CK 4 features moving into a paid premium version. The Sector 10 Starter Kit config remains free and will cover common editorial tasks with some nice additions
See Changes between CK4 and CK5 for more!
The tools available in the WYSIWYG toolbar will depend on the text field and its text format. This article lists the tools available for your main body content field using the Basic HTML text format.
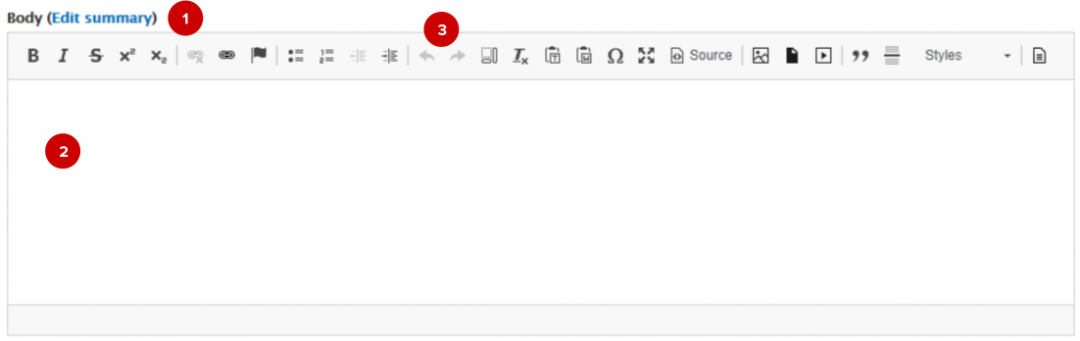
Screenshot - WYSIWYG editor
For the body field, the WYSIWYG editor includes a body summary ( 1 ), body text ( 2 ), and the WYSIWYG toolbar ( 3 ).
You should add a short summary (a sentence or two) for each piece of content. The summary ( 1 ) is used for teaser displays on your site as well as in search engine results and social media posts when someone shares a link to your content (depending on your HTML metadata settings). Make it count!
You can format body content ( 2 ) using the toolbar ( 3 ) in the WYSIWYG editor. Many of the formatting options will be familiar, but some may be new to you.
Highlight the text you want to be bold, italic, or with a strikethrough then click the relevant toolbar button - or click it before you start typing.
Use superscript and subscript for citations and numbers.
To add a link to existing text, highlight the text and use the 'Link' button - and, behold, the LinkIT 'Add link' box pops up.
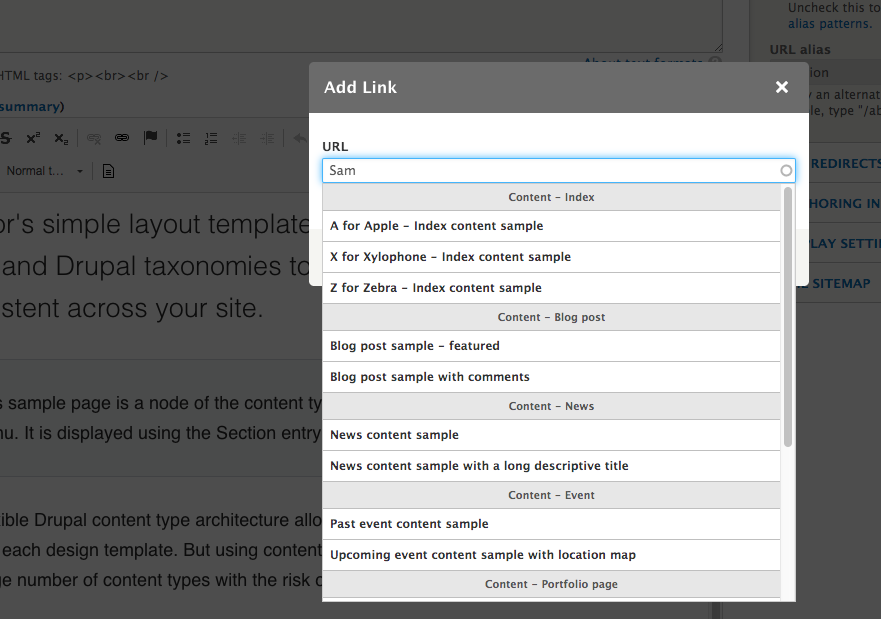
Screenshot - LinkIT autocomplete
To choose a link destination on your site, start typing the title of the content you want to link to, and select the item from the list.
Behind the scenes, LinkIT will link your content to the node ID (the number of the node) not your node alias (e.g. /this-is-the-page-title) - the node ID won't change, so this prevents a broken link if the node title and URL alias change later. Because of some nifty LinkIT and Drupal magic, your users - and search engines - will still see the human readable URL alias!
Select 'Unlink' to remove an existing link.
To link to some specific text, you first need to add an anchor to it.
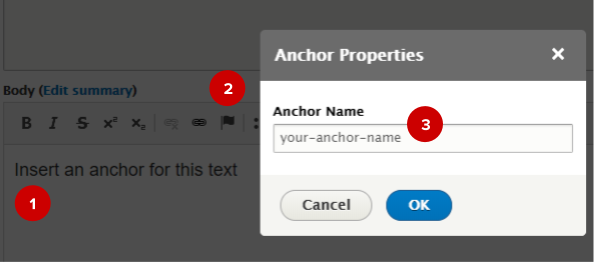
Screenshot - Inserting an anchor
This is done by placing your cursor before the text ( 1 ), clicking the 'Anchor' icon ( 2 ), and giving the anchor a suitable name ( 3 ).
To add a link to this anchored text within the same node, insert a link called #your-anchor-name
To link to the anchored text from another node, link to the node the anchor is on, but add #your-anchor-name to the end of the link (e.g. /node/123#your-anchor-name)
Highlight the text you want to be in a bulleted or numbered list, then click the relevant toolbar icon. You can also click the icon before you start typing.
You can use indents to create sub-lists inside a list. Place your cursor on the list line you wish to indent, then select the decrease or increase indent icon.
Undo your changes instead of using backspace to help make sure all formatting is removed. Redo can reverse the changes made by undo.
'Show Blocks' lets you check how your content has been split into HTML block elements (such as paragraphs and headings). This can be useful for troubleshooting formatting problems.
Highlight text and select 'Remove Format' to strip it of existing formatting. This is useful as it removes code snippets that might be getting in the way of formatting.
If you’re having issues formatting text that has been pasted into the editor, try pasting it as plain text - this will remove any existing formatting.
If you’re pasting from a Word document, try using 'Paste from Word' to keep some formatting.
Google Chrome does not currently support pasting using the toolbar. You can still use your standard keyboard shortcut to paste text into the WYSIWYG editor.
Special characters, such as Māori macrons, can be added using this button.
Increase the size of the WYSIWYG editor window to see more of your content.
If you have some HTML knowledge, you can use 'Source' to edit the body content in the source code.
Click on the relevant icon to insert an image, file, or video into your body content. For more on how to use media, see Adding media files in the WYSIWYG editor.
Highlight some text and click 'Block Quote' to style it larger and indented.
You can also click the icon before you start typing.
Insert a horizontal line on an empty line - you can use this to break up content.
Click on a block of text and select a style to be applied to it - such as different sized headings. You should use block styles to structure your content and improve readability.
Insert a template for formatting content (such as a callout box). For more on how to use templates, see Using WYSIWYG templates.