Last updated
Is there something wrong with this page?
We are updating our documentation library to be ready for Sector 10! Find out more in our Sector 10 roadmap or head straight to our collection of Sector 10 - Changes and Updates.
The Sector add-on Event content type lets you create events with a defined start date, end date, and location. This guide explains how to add and edit your event content.
Visit the Sector online demo to see sample events, a basic event landing page, and the events archive
For general guidance on adding and editing content, see: Adding new content to your site and Making changes to existing content on your site.
To add an event, use the AdminUI toolbar and navigate to Content > Add content > Event
<your.domain>/node/add/event
This takes you to a node edit form for an event node.
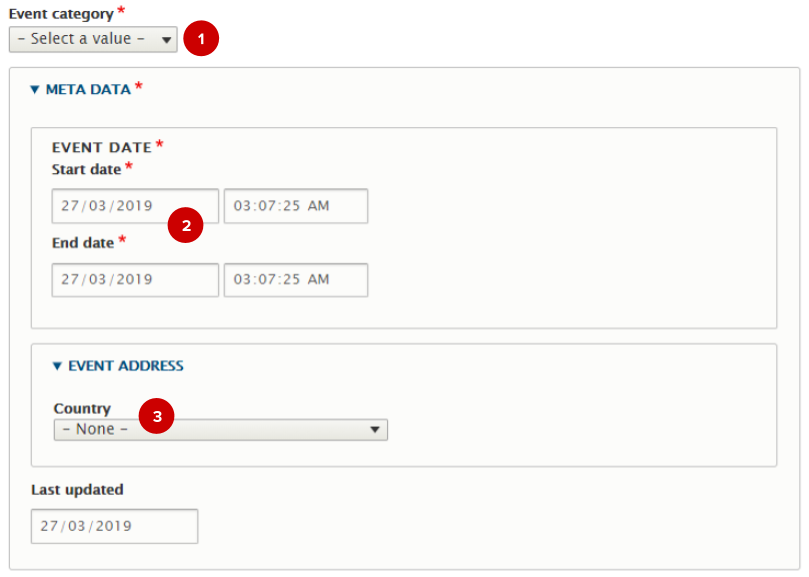
Screenshot - Selecting event category and metadata for an event node
Select an event category from the dropdown list ( 1 ). 'Event category' is a taxonomy, so its terms can be changed by content administrators.
Choose a start and end date/time for your event ( 2 ).
Once you’ve selected a country ( 3 ), you will be able to fill out more detail about the address.
In the 'Body' field, you can add and format the main content of your event. You can learn more about how to do this in our Introduction to the WYSIWYG editor.
When writing copy for your events, think about what your attendees might want to know:
You can attach related content in the form of internal and external links, as well as uploading files. To learn more about this, see Adding related content to a node.
The standard node settings (e.g. authoring information) are at the side of the node edit form. You can learn more about these settings in Changing standard node settings.
At the bottom of the node edit form you can save and preview your content. Before you save your event as 'published', you should preview it to see how it displays - see Previewing your content.
If you have entered the event address correctly, a Google map will be displayed on the event node - see the Sector Demo sample event
See our troubleshooting guide - An event map isn't displaying properly
Publish your node when you are ready.
Did something go wrong? You can revert to previous version of the node - See Creating and reverting revisions.